Django Tutorial Part 8: User authentication and permissions
In this tutorial, we'll show you how to allow users to log in to your site with their own accounts, and how to control what they can do and see based on whether or not they are logged in and their permissions. As part of this demonstration, we'll extend the LocalLibrary website, adding login, logout, and sign-up pages, and user- and staff-specific pages for viewing books that have been borrowed.
| Prerequisites: | Complete all previous tutorial topics, up to and including Django Tutorial Part 7: Sessions framework. |
|---|---|
| Objective: | To understand how to set up and use user authentication and permissions. |
Overview
Django provides an authentication and authorization ("permission") system, built on top of the session framework discussed in the previous tutorial, that allows you to verify user credentials and define what actions each user is allowed to perform. The framework includes built-in models for Users and Groups (a generic way of applying permissions to more than one user at a time), permissions/flags that designate whether a user may perform a task, forms and views for logging in users, and view tools for restricting content.
Note: According to Django the authentication system aims to be very generic, and so does not provide some features provided in other web authentication systems. Solutions for some common problems are available as third-party packages. For example, throttling of login attempts and authentication against third parties (e.g., OAuth).
In this tutorial, we'll show you how to enable user authentication in the LocalLibrary website, add login, logout, and sign-up pages, add permissions to your models, and control access to pages. We'll use the authentication/permissions to display lists of books that have been borrowed for both users and librarians.
The authentication system is very flexible, and you can build up your URLs, forms, views, and templates from scratch if you like, just calling the provided API to log in the user. However, in this article, we're going to use django-allauth, a third-party package built on Django's authentication system, for our login, logout, and sign-up pages. It comes with its own views, forms, and templates, so we'll only need to create one template, to make its pages look like the rest of our site.
We'll also show you how to create permissions, and check on login status and permissions in both views and templates.
Enabling authentication
The authentication was enabled automatically when we created the skeleton website (in tutorial 2) so you don't need to do anything more at this point.
Note:
The necessary configuration was all done for us when we created the app using the uv run python -m django startproject command. The database tables for users and model permissions were created when we first called uv run python manage.py migrate.
The configuration is set up in the INSTALLED_APPS and MIDDLEWARE sections of the project file (locallibrary/locallibrary_config/settings.py), as shown below:
INSTALLED_APPS = [
    # …
    'django.contrib.auth',  # Core authentication framework and its default models.
    'django.contrib.contenttypes',  # Django content type system (allows permissions to be associated with models).
    # …

MIDDLEWARE = [
    # …
    'django.contrib.sessions.middleware.SessionMiddleware',  # Manages sessions across requests
    # …
    'django.contrib.auth.middleware.AuthenticationMiddleware',  # Associates users with requests using sessions.
    # …
Creating users and groups
You already created your first user when we looked at the Django admin site in tutorial 4 (this was a superuser, created with the command uv run python manage.py createsuperuser).
Our superuser is already authenticated and has all permissions, so we'll need to create a test user to represent a normal site user. We'll be using the admin site to create our locallibrary groups and website logins, as it is one of the quickest ways to do so.
Note: You can also create users programmatically as shown below. You would have to do this, for example, if developing an interface to allow "ordinary" users to create their own logins (you shouldn't give most users access to the admin site).
from django.contrib.auth.models import User

# Create user and save to the database
user = User.objects.create_user('myusername', 'myemail@crazymail.com', 'mypassword')

# Update fields and then save again
user.first_name = 'Tyrone'
user.last_name = 'Citizen'
user.save()
When you start a new project, Django recommends setting up a custom user model before you run migrate for the first time, even if the default User model has every field you need, so that you can change it later if you need to.
LocalLibrary already uses the default User model, though, and switching to a custom user model in a project that already has a database is difficult.
So later in this article we'll extend the existing User model instead, with a separate model of our own that holds our custom fields, linked to User with a OneToOneField.
Below we'll create a group now; we'll create the users themselves later, by signing up for accounts, once we have the pages that let people do that. Even though we don't have any permissions to add for our library members yet, if we need to later, it will be much easier to add them once to the group than individually to each member.
Start the development server and navigate to the admin site in your local web browser (http://127.0.0.1:8000/admin/). Login to the site using the credentials for your superuser account. The top level of the Admin site displays all of your models, sorted by "Django application". From the Authentication and Authorization section, you can click the Users or Groups links to see their existing records.
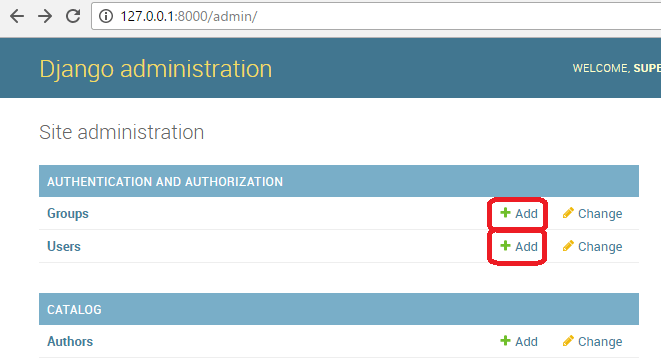
First let's create a new group for our library members.
- Click the Add button (next to Group) to create a new Group; enter the Name "Library Members" for the group.
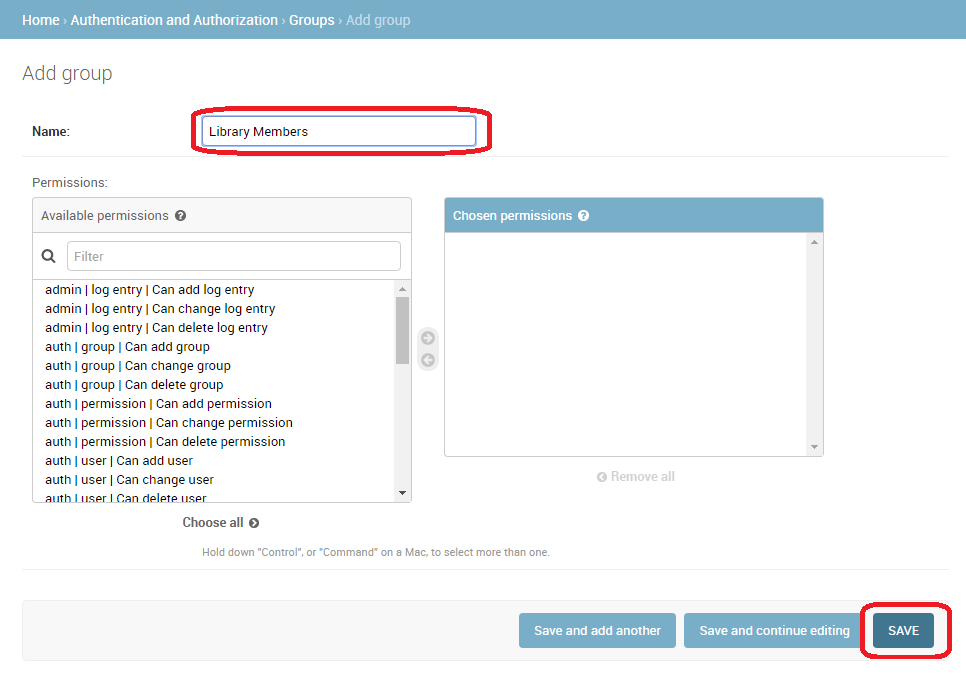
- We don't need any permissions for the group, so just press SAVE (you will be taken to a list of groups).
Note: You can also add users from the admin site (the Add button next to Users). We won't do that here, because users who sign up for themselves also verify their email address, which (as you'll see below) the site's login page will require.
Setting up your authentication views
Django provides almost everything you need for logging in, logging out, and password management "out of the box": a URL mapper, views, and forms (but not the templates). It does not provide a way for new users to sign up ("register") themselves, or to check that an email address someone typed in really belongs to them.
Rather than wire up Django's stock views and write a template for each of them, we'll use django-allauth, a widely used third-party package that is built on Django's authentication system. It provides login, logout, sign-up, email verification, and password reset pages, and it ships working templates for all of them. Later, the same package can also let people log in with an account they already have elsewhere, such as Google.
Users are still ordinary Django User objects, so everything else in this tutorial (user.is_authenticated, login_required, permissions, and so on) works exactly as it would with Django's own views.
Note: In this case, we could reasonably put the authentication pages inside our catalog application. However, if we had multiple applications it would be better to separate out this shared login behavior and have it available across the whole site, so that is what we've shown here!
Installing django-allauth
Add the package to your project:
uv add django-allauth
Settings
Open the project settings (/locallibrary/locallibrary_config/settings.py).
Add allauth's two apps to the end of INSTALLED_APPS:
INSTALLED_APPS = [
    # …
    'allauth',
    'allauth.account',
]
Add allauth's middleware to the end of MIDDLEWARE:
MIDDLEWARE = [
    # …
    'allauth.account.middleware.AccountMiddleware',
]
allauth's templates need the request context processor.
startproject already added it, but check that TEMPLATES still has this line:
            'context_processors': [
                'django.template.context_processors.request',
                # …
Then add the following to the bottom of the file:
# django-allauth
AUTHENTICATION_BACKENDS = [
    # Logs users in by username or by email address. It extends Django's
    # ModelBackend, so the admin site and permissions work as before.
    'allauth.account.auth_backends.AuthenticationBackend',
]
ACCOUNT_LOGIN_METHODS = {'username', 'email'}
ACCOUNT_SIGNUP_FIELDS = ['email*', 'username*', 'password1*', 'password2*']
ACCOUNT_EMAIL_VERIFICATION = 'mandatory'

# Redirect to home URL after login (Default redirects to /accounts/profile/)
LOGIN_REDIRECT_URL = '/'
AUTHENTICATION_BACKENDSis the list of ways Django checks a user's credentials. allauth's backend accepts either a username or an email address with the password.ACCOUNT_LOGIN_METHODSlets people log in with either their username or their email address.ACCOUNT_SIGNUP_FIELDSis the sign-up form. The*marks a field as required, andpassword2is the "type it again" field.ACCOUNT_EMAIL_VERIFICATION = 'mandatory'means a new account can't log in until its owner clicks the link in an email that allauth sends them. That proves the email address belongs to them, which matters as soon as you send that address anything (like a password reset link).LOGIN_REDIRECT_URLis where users go after logging in. By default Django expects you to have a profile page at/accounts/profile/, which we don't, so we send users to the site's home page instead.
allauth sends its emails (verification links and password reset links) with Django's email settings.
Sending real email is beyond the scope of this article, but you don't need to add anything to test it: the settings.py that startproject created should already have a MAILERS setting that uses the console backend, which prints any emails sent to the console (the terminal where runserver is running), so you can copy the links from there.
MAILERS = {
    'default': {
        'BACKEND': 'django.core.mail.backends.console.EmailBackend',
    },
}
Note:
Don't also add the older EMAIL_BACKEND setting that you may see in other tutorials: Django refuses to start if both are defined.
For more information, see Sending email (Django docs).
allauth has its own models (for example, the email addresses of each user and whether they have been verified), so create their tables:
uv run python manage.py migrate
Project URLs
Add the following to the bottom of the project urls.py file (locallibrary/locallibrary_config/urls.py) file:
# Add django-allauth's account urls (for login, logout, sign-up, password management)

urlpatterns += [
    path('accounts/', include('allauth.urls')),
]
Navigate to the http://127.0.0.1:8000/accounts/ URL (note the trailing forward slash!).
Django will show an error that it could not find a mapping for this URL, and list all the URLs that it tried.
From this you can see the URLs that allauth provides.
Note:
Adding the accounts/ path as shown above adds the following URLs (and a few more), along with names (given in square brackets) that can be used to reverse the URL mappings.
Note that allauth's URL names all start with account_, unlike the login and logout names you may see in Django's own documentation.
accounts/ login/ [name='account_login']
accounts/ logout/ [name='account_logout']
accounts/ signup/ [name='account_signup']
accounts/ confirm-email/ [name='account_email_verification_sent']
accounts/ confirm-email/<key>/ [name='account_confirm_email']
accounts/ email/ [name='account_email']
accounts/ password/change/ [name='account_change_password']
accounts/ password/reset/ [name='account_reset_password']
accounts/ password/reset/done/ [name='account_reset_password_done']
accounts/ password/reset/key/<uidb36>-<key>/ [name='account_reset_password_from_key']
accounts/ password/reset/key/done/ [name='account_reset_password_from_key_done']
Now navigate to the login URL (http://127.0.0.1:8000/accounts/login/).
Unlike Django's own views, this already works: allauth's templates are found in the allauth app.
The page is very plain, though, and it doesn't look like the rest of our site: there's no sidebar, and none of our styles.
Template directory
Every allauth page extends a single layout template, allauth/layouts/base.html. If we provide our own template with that name, all of allauth's pages will use it instead, so we can make them use our site's base template by creating just that one file.
For this site, we'll put templates that customize other apps' pages in the templates/ directory. This directory should be in your project root directory, that is, the same directory as the catalog and locallibrary_config folders. Create the templates/allauth/layouts/ folders now.
Note: Your folder structure should now look like the below:
locallibrary/   # Django top level project folder
  catalog/
  locallibrary_config/
  templates/
    allauth/
      layouts/
To make the templates directory visible to the template loader we need to add it in the template search path. Open the project settings (/locallibrary/locallibrary_config/settings.py).
Then import the os module (add the following line near the top of the file if it isn't already present).
import os # needed by code below
Update the TEMPLATES section's 'DIRS' line as shown:
    # …
    TEMPLATES = [
      {
       # …
       'DIRS': [os.path.join(BASE_DIR, 'templates')],
       'APP_DIRS': True,
       # …
Django searches the DIRS folders before it searches any app's templates/ folder, so a template in the project's templates/ folder always replaces an app's template with the same name.
(A template in catalog/templates/ would only win if catalog came before the other app in INSTALLED_APPS, which is easy to get wrong.)
Create a new HTML file called /locallibrary/templates/allauth/layouts/base.html and give it the following contents:
{% extends "base_generic.html" %}

{% block title %}{% block head_title %}{% endblock %} | Local Library{% endblock %}
That's the whole file.
allauth's templates put each page's heading and form in a block named content, and the page's title in a block named head_title.
Our base template already has a content block (the main column, next to the sidebar), so the forms land there, and the title block now puts allauth's page title in front of the site's name.
Navigate back to the login page (http://127.0.0.1:8000/accounts/login/) once you've saved your template. It should now have the same sidebar and styles as the rest of the site.
Note: You can override any of allauth's other templates the same way, to change how each form or email looks. See Templates in the allauth documentation. Be warned, though: how the login page looks is about the least interesting thing in a web application, so leave that kind of polishing until everything else works.
Testing the new authentication pages
Now that you've added the settings, the URL configuration, and the layout template, the authentication pages should just work! Start the development server and try them out:
- Open the sign-up page (
http://127.0.0.1:8000/accounts/signup/) and create an account with an email address, a username, and a password. allauth takes you to a page asking you to verify your email address. - Look in the terminal where
runserveris running. The verification email is printed there, including a link that looks likehttp://127.0.0.1:8000/accounts/confirm-email/…/. Open the link and press Confirm. - Log in at
http://127.0.0.1:8000/accounts/login/, first with the username and then (after logging out, below) with the email address. Either way, you should be redirected to the site's home page. If you try to log in to an account whose email address hasn't been verified yet, allauth sends you back to the "verify your email address" page instead. - Test the password reset from the "Forgot your password?" link on the login page. Again, the email with the reset link is printed in the terminal. allauth only sends reset links to email addresses that belong to existing users!
- To log out, open
http://127.0.0.1:8000/accounts/logout/and press Sign Out. Logging out has to be aPOSTrequest, so this page is a form with a button. We'll add a logout button to every page's sidebar in a moment.
Users who were created before allauth was installed, like the superuser you made with createsuperuser, don't have a verified email address yet.
They can still log in to the admin site, but the site's login page will ask them to verify their email address first.
To fix that, log in to the admin site (http://127.0.0.1:8000/admin/) and, in the new Accounts section, add an Email address for the user, with Verified and Primary both checked.
Library members
Now let's make the account you just signed up with a library member:
- Log in to the admin site with your superuser account.
- Under Authentication and Authorization, click Users, then click the username you signed up with.
- In the Groups section, select Library Members group from the list of Available groups, and then press the right-arrow between the boxes to move it into the Chosen groups box.
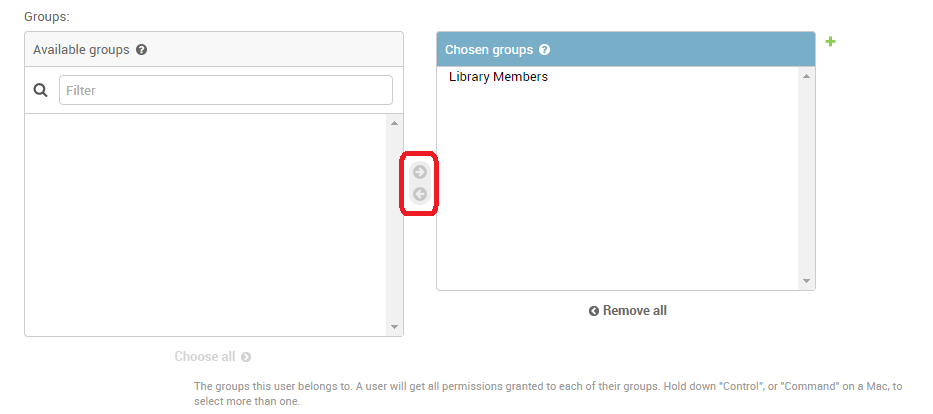
- We don't need to do anything else here, so just select SAVE to go to the list of users.
That's it! Now you have a "normal library member" account that you can use for testing.
Note: You should try signing up another library member user (use a different email address). Also, create a group for Librarians, and add a user to that too!
Testing against authenticated users
This section looks at what we can do to selectively control content the user sees based on whether they are logged in or not.
Testing in templates
You can get information about the currently logged in user in templates with the {{ user }} template variable (this is added to the template context by default when you set up the project as we did in our skeleton).
Typically you will first test against the {{ user.is_authenticated }} template variable to determine whether the user is eligible to see specific content. To demonstrate this, next we'll update our sidebar to display "Login" and "Sign up" links if the user is logged out, and a "Logout" link if they are logged in.
Open the base template (/locallibrary/catalog/templates/base_generic.html) and copy the following text into the sidebar block, immediately before the endblock template tag.
  <ul class="sidebar-nav">
    …
   {% if user.is_authenticated %}
     <li>User: {{ user.get_username }}</li>
     <li>
       <form id="logout-form" method="post" action="{% url 'account_logout' %}">
         {% csrf_token %}
         <button type="submit" class="btn btn-link">Logout</button>
       </form>
     </li>
   {% else %}
     <li><a href="{% url 'account_login' %}?next={{ request.path }}">Login</a></li>
     <li><a href="{% url 'account_signup' %}">Sign up</a></li>
   {% endif %}
    …
  </ul>
As you can see, we use if / else / endif template tags to conditionally display text based on whether {{ user.is_authenticated }} is true. If the user is authenticated then we know that we have a valid user, so we call {{ user.get_username }} to display their name.
We create the login link URL using the url template tag and the name of allauth's account_login URL configuration. Note also how we have appended ?next={{ request.path }} to the end of the URL. What this does is add a URL parameter next containing the address (URL) of the current page, to the end of the linked URL. After the user has successfully logged in, the view will use this next value to redirect the user back to the page where they first clicked the login link.
The logout template code is different, because to log out you must POST to the account_logout URL, using a form with a button.
(A GET request only shows allauth's "Are you sure you want to sign out?" page.)
After logging the user out, allauth redirects them to the site's home page.
By default this would render as a button, but you can style the button to display as a link.
For this example we're using Bootstrap, so we make the button look like a link by applying class="btn btn-link".
You also need to append the following styles to /locallibrary/catalog/static/css/styles.css in order to correctly position the logout link next to all the other sidebar links:
#logout-form {
  display: inline;
}
#logout-form button {
  padding: 0;
  margin: 0;
}
Try it out by clicking the Login/Logout links in the sidebar. Log in from a page other than the home page (for example, the list of all books) and check that you are brought back to that page afterwards.
Testing in views
If you're using function-based views, the easiest way to restrict access to your functions is to apply the login_required decorator to your view function, as shown below. If the user is logged in then your view code will execute as normal. If the user is not logged in, this will redirect to the login URL defined in the project settings (settings.LOGIN_URL), passing the current absolute path as the next URL parameter. If the user succeeds in logging in then they will be returned back to this page, but this time authenticated.
from django.contrib.auth.decorators import login_required

@login_required
def my_view(request):
    # …
Note:
You can do the same sort of thing manually by testing on request.user.is_authenticated, but the decorator is much more convenient!
Similarly, the easiest way to restrict access to logged-in users in your class-based views is to derive from LoginRequiredMixin. You need to declare this mixin first in the superclass list, before the main view class.
from django.contrib.auth.mixins import LoginRequiredMixin

class MyView(LoginRequiredMixin, View):
    # …
This has exactly the same redirect behavior as the login_required decorator. You can also specify an alternative location to redirect the user to if they are not authenticated (login_url), and a URL parameter name instead of next to insert the current absolute path (redirect_field_name).
class MyView(LoginRequiredMixin, View):
    login_url = '/login/'
    redirect_field_name = 'redirect_to'
For additional detail, check out the Django docs here.
Example — listing the current user's books
Now that we know how to restrict a page to a particular user, let's create a view of the books that the current user has borrowed.
Unfortunately, we don't yet have any way for users to borrow books! So before we can create the book list we'll first extend the BookInstance model to support the concept of borrowing and use the Django Admin application to loan a number of books to our test user.
Models
First, we're going to have to make it possible for users to have a BookInstance on loan (we already have a status and a due_back date, but we don't yet have any association between this model and a particular user. We'll create one using a ForeignKey (one-to-many) field. We also need an easy mechanism to test whether a loaned book is overdue.
Open catalog/models.py, and import the settings from django.conf (add this just below the previous import line at the top of the file, so the settings are available to subsequent code that makes use of them):
from django.conf import settings
Next, add the borrower field to the BookInstance model, setting the user model for the key as the value of the setting AUTH_USER_MODEL.
We haven't replaced the user model, so this maps to the default User model from django.contrib.auth.models.
borrower = models.ForeignKey(settings.AUTH_USER_MODEL, on_delete=models.SET_NULL, null=True, blank=True)
Note:
Referring to the user model through settings.AUTH_USER_MODEL is the convention used by Django itself and by reusable apps (such as allauth), so that they keep working in projects that replace User.
This tutorial uses the default model, so you could instead import the User model directly with the following lines:
from django.contrib.auth.models import User
borrower = models.ForeignKey(User, on_delete=models.SET_NULL, null=True, blank=True)
While we're here, let's add a property that we can call from our templates to tell if a particular book instance is overdue. While we could calculate this in the template itself, using a property as shown below will be much more efficient.
Add this somewhere near the top of the file:
from datetime import date
Now add the following property definition to the BookInstance class:
Note:
The following code uses Python's bool() function, which evaluates an object or the resulting object of an expression, and returns True unless the result is "falsy", in which case it returns False.
In Python an object is falsy (evaluates as False) if it is: empty (like [], (), {}), 0, None or if it is False.
@property
def is_overdue(self):
    """Determines if the book is overdue based on due date and current date."""
    return bool(self.due_back and date.today() > self.due_back)
Note:
We first verify whether due_back is empty before making a comparison. An empty due_back field would cause Django to throw an error instead of showing the page: empty values are not comparable. This is not something we would want our users to experience!
Now that we've updated our models, we'll need to make fresh migrations on the project and then apply those migrations:
uv run python manage.py makemigrations
uv run python manage.py migrate
Admin
Now open catalog/admin.py, and add the borrower field to the BookInstanceAdmin class in both the list_display and the fieldsets as shown below.
This will make the field visible in the Admin section, allowing us to assign a User to a BookInstance when needed.
@admin.register(BookInstance)
class BookInstanceAdmin(admin.ModelAdmin):
    list_display = ('book', 'status', 'borrower', 'due_back', 'id')
    list_filter = ('status', 'due_back')

    fieldsets = (
        (None, {
            'fields': ('book', 'imprint', 'id')
        }),
        ('Availability', {
            'fields': ('status', 'due_back', 'borrower')
        }),
    )
Loan a few books
Now that it's possible to loan books to a specific user, go and loan out a number of BookInstance records. Set their borrowed field to your test user, make the status "On loan", and set due dates both in the future and the past.
Note: We won't spell the process out, as you already know how to use the Admin site!
On loan view
Now we'll add a view for getting the list of all books that have been loaned to the current user. We'll use the same generic class-based list view we're familiar with, but this time we'll also import and derive from LoginRequiredMixin, so that only a logged in user can call this view. We will also choose to declare a template_name, rather than using the default, because we may end up having a few different lists of BookInstance records, with different views and templates.
Add the following to catalog/views.py:
from django.contrib.auth.mixins import LoginRequiredMixin

class LoanedBooksByUserListView(LoginRequiredMixin,generic.ListView):
    """Generic class-based view listing books on loan to current user."""
    model = BookInstance
    template_name = 'catalog/bookinstance_list_borrowed_user.html'
    paginate_by = 10

    def get_queryset(self):
        return (
            BookInstance.objects.filter(borrower=self.request.user)
            .filter(status__exact='o')
            .order_by('due_back')
        )
In order to restrict our query to just the BookInstance objects for the current user, we re-implement get_queryset() as shown above. Note that "o" is the stored code for "on loan" and we order by the due_back date so that the oldest items are displayed first.
URL conf for on loan books
Now open /catalog/urls.py and add a path() pointing to the above view (you can just copy the text below to the end of the file).
urlpatterns += [
    path('mybooks/', views.LoanedBooksByUserListView.as_view(), name='my-borrowed'),
]
Template for on-loan books
Now, all we need to do for this page is add a template. First, create the template file /catalog/templates/catalog/bookinstance_list_borrowed_user.html and give it the following contents:
{% extends "base_generic.html" %}

{% block content %}
    <h1>Borrowed books</h1>

    {% if bookinstance_list %}
    <ul>

      {% for bookinst in bookinstance_list %}
      <li class="{% if bookinst.is_overdue %}text-danger{% endif %}">
        <a href="{% url 'book-detail' bookinst.book.pk %}">{{ bookinst.book.title }}</a> ({{ bookinst.due_back }})
      </li>
      {% endfor %}
    </ul>

    {% else %}
      <p>There are no books borrowed.</p>
    {% endif %}
{% endblock %}
This template is very similar to those we've created previously for the Book and Author objects.
The only "new" thing here is that we check the method we added in the model (bookinst.is_overdue) and use it to change the color of overdue items.
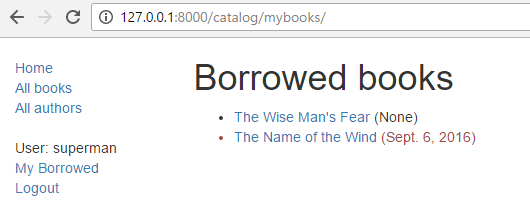
When the development server is running, you should now be able to view the list for a logged in user in your browser at http://127.0.0.1:8000/catalog/mybooks/. Try this out with your user logged in and logged out (in the second case, you should be redirected to the login page).
Add the list to the sidebar
The very last step is to add a link for this new page into the sidebar. We'll put this in the same section where we display other information for the logged in user.
Open the base template (/locallibrary/catalog/templates/base_generic.html) and add the "My Borrowed" line to the sidebar in the position shown below.
 <ul class="sidebar-nav">
   {% if user.is_authenticated %}
   <li>User: {{ user.get_username }}</li>

   <li><a href="{% url 'my-borrowed' %}">My Borrowed</a></li>

   <li>
     <form id="logout-form" method="post" action="{% url 'account_logout' %}">
       {% csrf_token %}
       <button type="submit" class="btn btn-link">Logout</button>
     </form>
   </li>
   {% else %}
   <li><a href="{% url 'account_login' %}?next={{ request.path }}">Login</a></li>
   <li><a href="{% url 'account_signup' %}">Sign up</a></li>
   {% endif %}
 </ul>
What does it look like?
When any user is logged in, they'll see the My Borrowed link in the sidebar, and the list of books displayed as below (the first book has no due date, which is a bug we hope to fix in a later tutorial!).
Storing extra information about users
Django's User model stores the information that every site needs to log someone in: a username, a password, an email address, a first and last name, and a few flags such as is_staff.
Most sites need to store more than that about their users.
A library, for example, might want each member's library card number, and a limit on how many books they can borrow at once.
There are two ways to do this:
- A custom user model, which replaces Django's
Userwith a class of your own (usually a subclass ofAbstractUser), to which you can add fields. This is what Django recommends for a new project, but it has to be set up before you runmigratefor the first time. Switching to a custom user model in a project that already has users in its database (like ours) is complicated and easy to get wrong. - A profile model, which extends the existing user model: an ordinary model of your own that holds the custom fields, linked to the user model with a
OneToOneField. You can add one at any time, and Django'sUsermodel, the admin site's user pages,createsuperuser, and third-party apps like allauth all keep working exactly as before.
These aren't either/or. Even in a project that starts with a custom user model, the Django docs suggest keeping app-specific information about users in a separate model like this, so that each app can store what it needs without every app having to change the user model.
Note:
For your own new projects (such as your final project), start with a custom user model.
Before you run migrate for the first time, create an app for it (for example, accounts), and add this to its models.py:
from django.contrib.auth.models import AbstractUser

class User(AbstractUser):
    pass
Then set AUTH_USER_MODEL = 'accounts.User' in settings.py, and register the model in the app's admin.py with admin.site.register(User, UserAdmin) (importing UserAdmin from django.contrib.auth.admin).
It behaves exactly like the default User for now, but you'll be able to add fields to it later with an ordinary migration.
In code, always refer to it as settings.AUTH_USER_MODEL (in models) or get_user_model() (everywhere else), never by importing User directly.
LocalLibrary already uses the default User model, so we'll extend it with a UserProfile model.
The UserProfile model
A OneToOneField is a relationship in which each record on one side is linked to at most one record on the other side.
It works just like a ForeignKey (in the database, it is a foreign key, with a constraint that each value can only appear once), except that following the relationship backwards gives you a single object instead of a list.
So each user has exactly one profile, and each profile belongs to exactly one user.
Open catalog/models.py, and add the following model to the end of the file (you already imported settings for the borrower field):
class UserProfile(models.Model):
    """Library-specific information about a user, in addition to Django's User model."""
    user = models.OneToOneField(
        settings.AUTH_USER_MODEL,
        on_delete=models.CASCADE,
        related_name='profile',
    )
    library_card_number = models.CharField(
        max_length=20, blank=True, help_text='The number printed on the member\'s library card')
    max_loans = models.PositiveSmallIntegerField(
        default=5, help_text='How many books this member may borrow at once')

    def __str__(self):
        """String for representing the Model object."""
        return f'Profile for {self.user}'
useris the link to theUsermodel. As withborrower, we refer to it assettings.AUTH_USER_MODELrather than importingUserdirectly.on_delete=models.CASCADEmeans that deleting a user also deletes their profile, which is no use without them.related_name='profile'sets the name for following the relationship backwards, from a user to their profile:user.profile. Without it, Django would name it after the model, asuser.userprofile.library_card_numberandmax_loansare the extra information we want to store.library_card_numberisblank=Truebecause new members who sign up on the website don't have a card yet.max_loanshas a default, so that every new profile gets a sensible limit without anyone having to set it.
Now you can get from a user to their information in either direction:
request.user.profile.library_card_number   # From a user to their profile
some_profile.user.email                    # From a profile to its user
Make and apply the migrations:
uv run python manage.py makemigrations
uv run python manage.py migrate
Creating a profile for every user
A profile doesn't appear by itself when someone signs up: something has to create it.
If a user doesn't have one, user.profile raises a RelatedObjectDoesNotExist exception, so we want to make sure that every user always has a profile.
We'll use a Django signal to do this.
Signals let one part of a project run code when something happens in another part, without either part having to know about the other.
Django sends the post_save signal every time a model instance is saved, so we can listen for it and create a profile whenever a new User is saved, whether they were created by allauth's sign-up page, the admin site, createsuperuser, or your tests.
Create the file catalog/signals.py and give it the following contents:
from django.conf import settings
from django.db.models.signals import post_save
from django.dispatch import receiver

from .models import UserProfile


@receiver(post_save, sender=settings.AUTH_USER_MODEL)
def create_user_profile(sender, instance, created, **kwargs):
    """Create a UserProfile whenever a new user is created."""
    if created:
        UserProfile.objects.create(user=instance)
The @receiver decorator connects the function to the post_save signal of the user model.
The created argument is True only the first time a user is saved, so we create the profile then, and not every time the user logs in or changes their password.
The decorator only connects the function when the module is imported, and nothing imports catalog/signals.py yet.
The usual place to import it is the ready() method of the app's configuration class, which Django calls once when it starts.
Open catalog/apps.py and add a ready() method to the CatalogConfig class:
from django.apps import AppConfig


class CatalogConfig(AppConfig):
    default_auto_field = 'django.db.models.BigAutoField'
    name = 'catalog'

    def ready(self):
        # Connect the signal handlers in signals.py.
        from . import signals  # noqa: F401
Note:
Leave default_auto_field as it is in your file, if it's different: only the ready() method is new.
The signal only fires for users created from now on, so your existing users (including your superuser and the library member you signed up with earlier) don't have profiles yet. Create them in the Django shell:
uv run python manage.py shell
>>> from django.contrib.auth import get_user_model
>>> from catalog.models import UserProfile
>>> for user in get_user_model().objects.all():
...     UserProfile.objects.get_or_create(user=user)
...
>>> exit()
get_or_create() only creates a profile for users who don't have one, so it's safe to run this more than once.
Editing profiles in the admin site
Librarians will want to see and change a member's card number and loan limit on the same admin page as the rest of the member's details. We can do that by adding the profile to the user's admin page as an inline, just as we added book instances to the book admin page in Django Tutorial Part 4: Django admin site.
The User admin page belongs to django.contrib.auth, so we unregister its admin class and register a subclass of it that adds our inline.
Add the following to the end of catalog/admin.py:
from django.contrib.auth import get_user_model
from django.contrib.auth.admin import UserAdmin

from .models import UserProfile


class UserProfileInline(admin.StackedInline):
    model = UserProfile
    can_delete = False


admin.site.unregister(get_user_model())


@admin.register(get_user_model())
class UserWithProfileAdmin(UserAdmin):
    inlines = [UserProfileInline]
can_delete = False hides the "Delete" checkbox for the profile, because a user should always have one.
Open a user in the admin site (http://127.0.0.1:8000/admin/auth/user/): the User profile section at the bottom of the page shows the new fields.
Give your library member a card number and save.
Using the profile in templates and views
Because user is available in every template, so is user.profile.
Open the base template (/locallibrary/catalog/templates/base_generic.html) and show the card number under the username in the sidebar:
   {% if user.is_authenticated %}
   <li>User: {{ user.get_username }}</li>
   {% if user.profile.library_card_number %}
     <li>Card: {{ user.profile.library_card_number }}</li>
   {% endif %}
   …
Next, let's show members how many more books they can borrow.
Open /catalog/templates/catalog/bookinstance_list_borrowed_user.html, and add the following paragraph directly below the <h1> heading:
<p>You have borrowed {{ paginator.count }} of {{ user.profile.max_loans }} books.</p>
Our LoanedBooksByUserListView sets paginate_by, so its template gets a paginator variable, and paginator.count is the total number of books on loan to the user (not just the number on the current page).
In a view, you get to the profile in the same way, from request.user.
For example, a view that lets a member borrow a book could check their limit like this:
loans = BookInstance.objects.filter(borrower=request.user, status__exact='o').count()
if loans >= request.user.profile.max_loans:
    # Don't let them borrow any more books.
Log in as your library member and check the sidebar and the My Borrowed page. Then sign up a new user, and check in the admin site that they got a profile automatically.
Permissions
Permissions are associated with models and define the operations that can be performed on a model instance by a user who has the permission. By default, Django automatically gives add, change, and delete permissions to all models, which allow users with the permissions to perform the associated actions via the admin site. You can define your own permissions to models and grant them to specific users. You can also change the permissions associated with different instances of the same model.
Testing on permissions in views and templates is then very similar to testing on the authentication status (and in fact, testing for a permission also tests for authentication).
Models
Defining permissions is done on the model class Meta section, using the permissions field.
You can specify as many permissions as you need in a tuple, each permission itself being defined in a nested tuple containing the permission name and permission display value.
For example, we might define a permission to allow a user to mark that a book has been returned as shown:
class BookInstance(models.Model):
    # …
    class Meta:
        # …
        permissions = (("can_mark_returned", "Set book as returned"),)
We could then assign the permission to a "Librarian" group in the Admin site.
Open the catalog/models.py, and add the permission as shown above. You will need to re-run your migrations (call uv run python manage.py makemigrations and uv run python manage.py migrate) to update the database appropriately.
Templates
The current user's permissions are stored in a template variable called {{ perms }}. You can check whether the current user has a particular permission using the specific variable name within the associated Django "app" — e.g., {{ perms.catalog.can_mark_returned }} will be True if the user has this permission, and False otherwise. We typically test for the permission using the template {% if %} tag as shown:
{% if perms.catalog.can_mark_returned %}
    <!-- We can mark a BookInstance as returned. -->
    <!-- Perhaps add code to link to a "book return" view here. -->
{% endif %}
Views
Permissions can be tested in function view using the permission_required decorator or in a class-based view using the PermissionRequiredMixin. The pattern are the same as for login authentication, though of course, you might reasonably have to add multiple permissions.
Function view decorator:
from django.contrib.auth.decorators import permission_required

@permission_required('catalog.can_mark_returned')
@permission_required('catalog.can_edit')
def my_view(request):
    # …
A permission-required mixin for class-based views.
from django.contrib.auth.mixins import PermissionRequiredMixin

class MyView(PermissionRequiredMixin, View):
    permission_required = 'catalog.can_mark_returned'
    # Or multiple permissions
    permission_required = ('catalog.can_mark_returned', 'catalog.change_book')
    # Note that 'catalog.change_book' is permission
    # Is created automatically for the book model, along with add_book, and delete_book
Note: There is a small default difference in the behavior above. By default for a logged-in user with a permission violation:
@permission_requiredredirects to login screen (HTTP Status 302).PermissionRequiredMixinreturns 403 (HTTP Status Forbidden).
Normally you will want the PermissionRequiredMixin behavior: return 403 if a user is logged in but does not have the correct permission. To do this for a function view use @login_required and @permission_required with raise_exception=True as shown:
from django.contrib.auth.decorators import login_required, permission_required

@login_required
@permission_required('catalog.can_mark_returned', raise_exception=True)
def my_view(request):
    # …
Example
We won't update the LocalLibrary here; perhaps in the next tutorial!
Challenge yourself
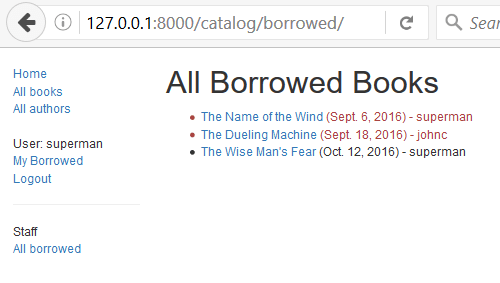
Earlier in this article, we showed you how to create a page for the current user, listing the books that they have borrowed. The challenge now is to create a similar page that is only visible for librarians, that displays all books that have been borrowed, and which includes the name of each borrower.
You should be able to follow the same pattern as for the other view. The main difference is that you'll need to restrict the view to only librarians. You could do this based on whether the user is a staff member (function decorator: staff_member_required, template variable: user.is_staff) but we recommend that you instead use the can_mark_returned permission and PermissionRequiredMixin, as described in the previous section.
Warning: Remember not to use your superuser for permissions based testing (permission checks always return true for superusers, even if a permission has not yet been defined!). Instead, create a librarian user, and add the required capability.
When you are finished, your page should look something like the screenshot below.
Summary
Excellent work — you've now created a website where library members can log in and view their own content, where each member has a profile that stores library-specific information about them, and where librarians (with the correct permission) can view all loaned books and their borrowers. At the moment we're still just viewing content, but the same principles and techniques are used when you want to start modifying and adding data.
In our next article, we'll look at how you can use Django forms to collect user input, and then start modifying some of our stored data.
See also
- User authentication in Django (Django docs)
- Using the (default) Django authentication system (Django docs)
- Extending the existing User model (Django docs)
- django-allauth: Quickstart and Account configuration (allauth docs)
- Introduction to class-based views > Decorating class-based views (Django docs)